Monday, August 31, 2009

Wendy's Living/Dining Room Redesign

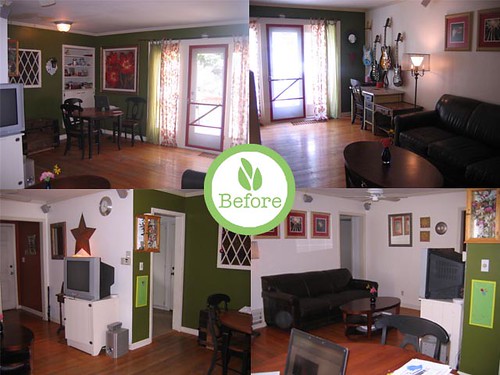
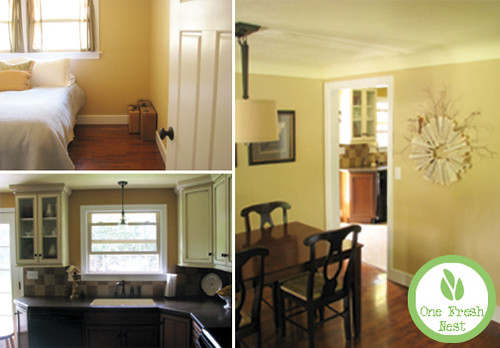
Wendy's main goal with her space was to make sure everything was in the best place possible.  She wanted to ensure that all their space was being utilized properly.  I've made some minor changes and updated a few things while adding more flexible seating to update her space without spending lots of money.  Many times, in homes of this size there are a limited number of ways that furniture can be laid out.  There's lots of space needed for circulation and maybe only one wall that has cable limiting where the TV is placed.  The key in these spaces is to make sure that furniture, if possible, serves a dual purpose.

Room Redesign Tips


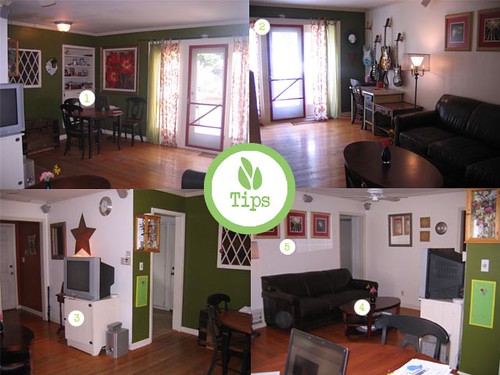
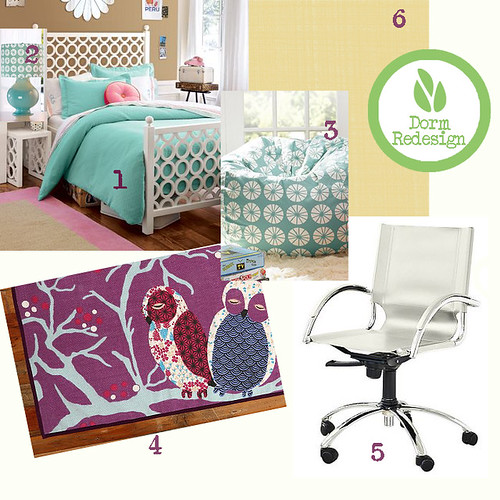
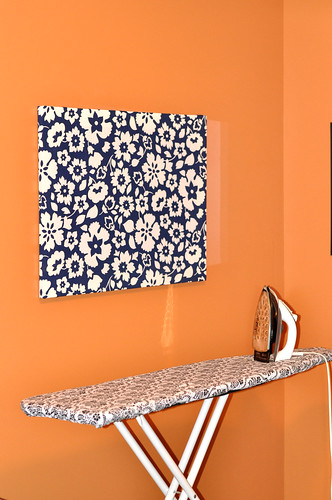
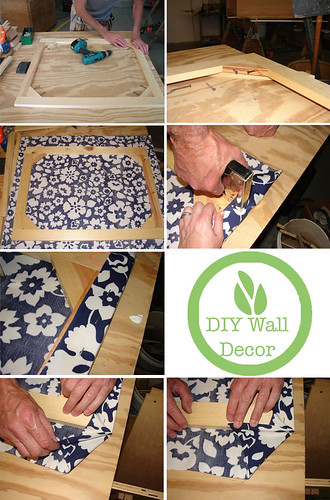
1. Remove the doors from this cabinet.  Make simple fabric panels to cover the bottom.  By doing this you'll be able to utalize more space in this corner because it's not needed for opening the doors to access the bottom of the built-ins.  Use Amy Butler Fabric August Fields Graceful Vines Orange.  Paint the inside of the upper cabinets a coordinating orange, SW 6889 Stirring Orange.  Add a circular rug to help define the space.  This round 6' rug from Rugs Direct would work well.


2. Use the same Amy Butler Fabric Graceful Vines, to make some drapery panels for these windows.  This will bring in some of the accent orange as well.


3. Let's paint this TV stand.  The furniture that you have thus far work well together as they are all a similar style and finish, except for the TV stand.  By darkening this piece (Use Sherwin Williams Color SW 6070 Turkish Coffee) you will tie this in as well.  I think you'll find that you won't feel like your furniture is a modge podge anymore!


4. Replace this coffee table with 3 of these ottomans from Overstock.com and use as a base to make your own covers with the Amy Butler Fabric-Lotus Wall Flower Green.  (Yes the colors don't match at all on the originals, but for $24 a piece you can't go wrong!  If you build these from scratch they would be more expensive.)  Don't forget to use Scotchguard on these and they'll last for quite a while and stand up to your children using them!  These will provide flexible seating for you.  They can be used as a coffee table for now, then when more seating is needed, just pull them out for seating!  Instead of a large area rug here, buy 3 carpet tiles from FLOR and use these to place the ottomans on.  You're essentially making a small runner for the ottomans.  I'd go with All Square-Orange.  (When you're using the ottomans as seating, just slide the carpet under the sofa!)

5. Many designers will tell you to hang all artwork at eye level but there are times (many times in fact!) that this is not always the case.  Right now it seems like they are floating above the rest of the items in the room, if you move them down about 12" they will then be seen as part of the furniture arrangement that includes the ottomans and sofa!  This will provide more continuity in the space, which is needed in a smaller space.

Here is the design board with the items from above:
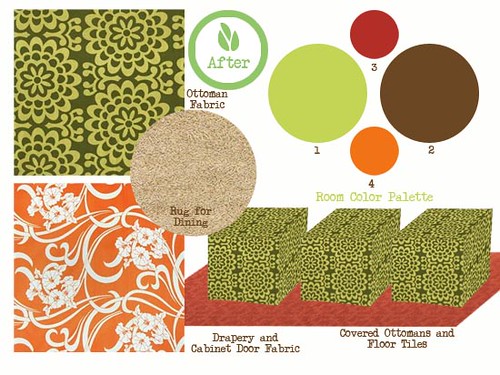
Wendy's Design BoardColor Palette


1. New Wall Color: Sherwin Williams SW 6711 Parakeet


2. New TV Stand Color: Sherwin Williams SW  6070 Turkish Coffee


3. Accessory Color (You already have this covered!)


4. Cabinet Color for inside the built in cabinets in your dining space: Sherwin Williams SW 6889 Stirring Orange


I love your guitar arrangement!  Thanks so much Wendy for letting us help you with your space!!

erin_sig

Do you need help redesigning your space?  Click here to get started!

Friday, August 28, 2009

Monday Redesign-Wendy's Living/Dining Room


Monday we're assisting Wendy with her  Living Room and Dining Room space.  Here is her current design:

Monday Redesign:Before


Here are Wendy's goals with the space above:

What are your favorite design store/home décor stores?  They can be brick and mortar stores or online stores.  The answers to this question help us determine your budget by seeing which places you like to shop.  These also tell us a little bit about your style. I am a huge fan of Anthropology and Crate and Barrel for ideas.  Then I utilize flea market/garage sale finds to try to replicate some of the items.  I like furniture redos (painting, simple upholstery, change knobs, etc.).  I have inherited many of the pieces in this room.  The sofa is the only furniture piece that I bought new.  Sometimes, this makes my rooms too hodgepodge/college aesthetic.  I am not married to any of the accessories in this room.  My favorite one is the flower painting because I think it is so fun.  I also sew and can make pillows or window treatments. I LOVE Amy Butler’s fabrics and would love to use them somehow.  The interview that you did with her was great.  I am a huge fan!  Her new rugs are so amazing.


What 3 words would you use to describe yourself and the feeling of the space you'd like? Warm, happy and colorful.


What is the most important thing you ’d like done with the space? I think the space layout needs attention.  Also, we like to have people over but there is never enough comfortable seating for all of them.  I have 2 kids who are 3 and 6 so although they are old enough to not pull things down, they still spill plenty of things on the floor/sofa so this is important to know.  Because the space is small everything must be very functional and flexible.


What are two of your favorite and least favorite colors? (Keep this particular space in mind, as we know favorite colors vary from space to space) I love bold colors.  We have lived with the dark green on the walls for 6 years now.  I still really like it but would be up for an update.  Also Red!  I love red and variations of it.  (This is probably why I like the green because anything red looks great with it.)  Not a huge fan of pastels.


What are the overall dimensions, including ceiling height (if applicable) of your space?
This room is an L- Shaped room with many doorways.  See attached drawing.  The ceilings are 9’.


Is there anything else you’d like us to include or consider in designing your space? We live in 1,000 SF so this is a very important room to all of us.  We eat, watch TV, hobby, play, entertain, relax, and just plain live here a lot.  I think there are some great opportunities for utilizing the space that we haven’t thought of. My husband is an avid guitar player.  Our solution to having guitar stands everywhere was to hang them on the wall.  I like this but would be open to changing the location or splitting them up if you thought we should for the layout to work.

Check back Monday for the redesign!

erin_sig

Thursday, August 27, 2009

Before & After: Living & Dining Room

Before & After

Rachel Winokur from eTTa designs sent in this wonderful redesign done for homeowners in California.  It is a living and dining area.  Isn't it amazing?  I really like the rug in the dining area, and I love the mixtures of reds, greens and yellows. 

What do you think?  Are you working on something that you'd like to share?  Send it our way at admin AT freshnestdesign DOT com.

deb_sig

Winners: LaundryTree Soapnuts Giveaway

laundrytree_starterkit_lowres


The winners of the LaundryTreeSoapNut Starter Kit {100g soapnuts, an essential or fragrant oil, an extra washbag and a sample bag} are:


#3 Chelsey who said, "I’ve heard about these before, and I have always wanted to try them! They sound so fun!"  and


#17 Kara who said, "I have never heard of these but would really love to try them."


Send your mailing information to admin AT freshnestdesign DOT com and we will pass it along to LaundryTree.


Thanks to LaundryTree for sponsoring such a great giveaway and providing a natural and chemical free way to do our laundry! 


deb_sig   and    erin_sig

Wednesday, August 26, 2009

Downloadable Space Planner

Today I've got a treat for you!  We've created a free space plan download so that you can design and rearrange your own space.  It's simple to do and can even be reused!

spaceplanbutton


You'll need Acrobat Reader to open and print it.

Instructions:

Print all sheets on white cardstock and laminate the grid sheet.  After you've laminated it you're ready to go.  Cut out the furniture pieces, doors, and windows that you need.

Use a dry erase marker to outline your room, remember that each square is 6" so each 1 foot piece of wall will take up 2 squares, got it?  When you need to do another room, just erase and layout your next space!  Yea! What do you think?  Will you use it?  Let us know if there's any pieces that you've just got to have and we'll see about adding in another add-on download.

erin_sig

Tuesday, August 25, 2009

Kitchen Love

Painted kitchen floors: Pratt & Lambert gray + white cabinets + green interiors


Image from xJavierx


Don't you just love how clean and bright this kitchen feels.  And I love how the cabinets are painted green inside!  What a nice surprise.  (And I bet you didn't even realize that the kitchen floor is painted too.)


kitchen1_medium.jpg


Image from SarahLeeab


Love the mixture of the blue and red.  Looks fabulous!


erin_sig

Monday, August 24, 2009

Dorm Room Inspiration

I still have back to school on the mind so I'm here today with a fun dorm room design.  This would be for a girl with modern style with a hint of vintage.  If I could go back to college, and live in a teeny, tiny space again, I would like to think this is what my room would be like.

Dorm Room Redesign


And now for the break down of goodies:

  1. This bedding is from PB Teen and I think it's fun and girly, but not over the top.  I love the bed that it sits on too, it reminds me a lot of this DIY PVC frame.

  2. This matching lamp goes perfect with the theme.  Yes, I'm all over PB Teen today. 

  3. And let's not forget seating for guests with this matching bean bag.  What can I say?  I just love it. 

  4. Place this mat outside your front door to set you apart from all your neighbors.  It's cute and fun, and I love owls.

  5. Every college student needs a sleek and comfy computer chair.  I really like this white one from west elm.

  6. The biggest problem with most dorm rooms is they are painted a sterile white, and more than likely, you're not able to paint the walls.  Here's the perfect solution.  Use temporary wall paper- in a yellow faux linen to spruce up your space.  It will immediately start to feel like home.


So what do you think?  Are you getting someone you know ready for college?  What would you have done differently about your college dorm room? 

deb_sig

Don't forget to enter our current giveaway from Laundry Tree for a SoapNut Starter Kit!  The giveaway ends Wednesday.

Friday, August 21, 2009

DIY Wall Decor

DIY wall art


Need a quick and easy piece of wall art?  {And inexpensive too!}  Here are the step by step instructions:  


Materials needed:


  • Piece of large scale fabric- with a large scale print {(mine was about 40" x 44"}


  • Heavy duty Stapler


  • 4 pieces of wood and a drill {or buy the regular canvas stretcher bars like these - you can find them at most art supply stores}


DIY Wall decor


Step by Step instructions:

  1. Put your wooden frame together.  We used a drill to place triangle braces on the corners of the frame.  If you are using canvas stretcher bars instead, they will interlock and the only tool you will need for this project is a heavy duty stapler.

  2. Lay the fabric face down with the frame on top {make sure you iron it first}.  Position the fabric and make sure it's straight before you start stapling.  Allow for a couple inches of fabrics on each side of the frame.  {My frame ended up being 32"x 36"}.  Pull the fabric up and over your frame and start stapling. 

  3. For the corners, I wrapped it like a present.  Before I stapled it down, I made sure it looked okay from the front.

  4. Attach a picture hanger on the back, and it's ready to hang.


The cost of this project is very minimal, and it's a very easy wall decor project.  Now I have something fun to look at when I'm ironing.

deb_sig

Quick Stain Removal Guide

Now that the children are back in school you can't be there to change their clothing as soon as a stain happens.  Here are a few reminders for easily removing various stains.

Ink: Use hairspray.  You probably have that right?  The alcohol in the spray helps to break up the ink.  Just spray and let it sit, the spray again.  Repeat this until the ink is gone.  Then wash it out with your regular detergent.

Fruit Juice: Make a paste with cream of tarter and warm water and spread on the stain.  Let it sit for 1/2 to 1 hour and then rinse and wash regularily with your other laundry.

Oil: Scrub some dishwasher detergent on the oil spot and let it sit for a little bit.  Wash in warm water as normal.

Crayon (or melted crayon from those ones that accidentally stayed in someone's pocket): Place the item in the freezer until the crayon is hard and brittle.  Shatter and shake off the excess.  Sponge the excess with a spot stain remover and you're good to go!

Do you have a special remedy you'd like to share?  Be sure to leave us a comment!

erin_sig

Thursday, August 20, 2009

Giveaway- Laundry Tree Soapnuts

laundrytree_starterkit_lowres


I am terrible at laundry.  Terrible at getting out the spots.  Terrible about line drying nicer clothes.  It's something I just struggle with.  I met Lisa from Laundry Tree back in February at the Mom 2.0 Summit.  We connected instantly as she is bubbly and full of fun.  She was there promoting her soapnuts and even though I loved her, I had a hard time buying into the fact that a berry could clean my laundry.  We reconnect about a month ago and she quickly sent me a sample.  I couldn't believe how soft my clothes were after the first time I ran them through with the soapnuts!  It was unbelievable.  I also loved that I could change scents with each load depending on what mood I was in.


Just to give you a little more information about soapnuts.  They are 100% natural and are free of harsh chemicals so they are gentle on clothes and skin.  Soapnuts are the fruit of a tree.  The outer shell of the soapnut contains saponin, a natural substance known for its ability to cleanse and wash.  To read more about the process and how it works, go to Laundry Tree's website


Lisa is here today sharing her soapnuts with a giveaway.  Two lucky readers will receive a LaundryTree SoapNut Starter Kit {100g soapnuts, an essential or fragrant oil, an extra washbag and a sample bag}.  Just leave a comment below.  The giveaway will go until Wednesday, August 26th and the winner will be announced on Thursday!


deb_sig and    erin_sig


Creatively Displaying Children's Art

So you've got stacks and stacks of your child's artwork, right?  So how do you keep them all and display them all, without it looking like a collage on your fridge with papers of all sizes, shapes, and colors together?  Here are a few ways:

Displaying Children's Artwork


1. Scan in all, or just your favorites and make a Blurb book.  I've seen many of these self-printed books in person and their quality is fantastic!  There are prices and sizing for every budget.  How great would it be to have all your children's artwork in a nice hardback book with nice clean edges?  Don't worry if you've never laid out a book before.  They have many good free templates in their free book maker software.  Just drop in your pictures, add text and get it printed!  (Three Little Pigs)

2. Frame it like Photographer Jen Morris.


3. Buy a roll of string and some cute clips.  Different places sell them like Land of Nod and IKEA.  Or make your own.

4. Magnetize a wall.  Use magnetic paint and then paint over it with regular latex paint.  Decorate some magnets and you've got an art gallery!  (See a full tutorial here.)

erin_sig

Wednesday, August 19, 2009

Flashback Wednesdays


Does this little juice box bring back any memories? Remember the commercial with the cute stockboy that promised this incredible juice- Ecto Cooler? Ah, he was so dreamy.

Time Saving Back to School Tips

I don't have children yet, but I do know that mornings can be a rush, especially when everyone is getting ready and has to go in many different directions.  Here are a few tips to get your day started right:

Emily's meant to be doing her homework!
Attribution-NoDerivs License by squarepants2004j/auntyhuia

1. Set out homework, signed slips, and anything else that needs to go to school the next day, better yet, get it all packed so the backpacks are ready to grab and go.

New Lunch Bag
Attribution-NonCommercial-NoDerivs License by ex.libris

2. Use the weekend to get lunch items ready for the upcoming week.  Make a couple of batches of jello, pudding, salad, or cut up veggies and put into small plastic containers.  They stack nicely in the fridge and are tons cheaper than buying the pre-made ones.  When you're ready to pack lunch in the morning, just grab a few of your pre-made containers and add to the lunch box.

baby sweater
Attribution-NonCommercial-NoDerivs License by exile in suburbia

3.  Help your child set out two outfits the night before.  In the morning they can choose between the two and hopefully this will reduce the amount of disagreements over what can be worn!

erin_sig

Clock Giveaway Winner

Thanks everyone for all your entries!!  We used Random.org to pick the winner.  The winner of the custom clock made by Pilot Design goes to:

Number 11!!!

Katie @ Making This Home Says:


My fingers are crossed. Thanks for a shot at something so beautiful.
Katie


Congrats Katie!  Please email us your shipping information and we'll get that sent to you right away!

deb_sig and  erin_sig

Tuesday, August 18, 2009

One Fresh Nest: Danyelle's Cozy Brick House

One Fresh Nest is a new feature that we're doing on the site where we highlight a home that is beautiful and inspiring. 

img_1765


Our first Fresh Nest is Danyelle's home.  Danyelle is a mother of five, is a genius creative and kind.  She blogs over at Dandee Designs and My Favorite Things.  She lives in what she calls the cozy brick house and she makes it just that. 


What is your favorite room in the cozy brick house & why? 
I really love our master bedroom.  It's actually funny to call it that.  Our home was built in the fifties and at that time most houses didn't have what we now consider a master.  Our bedroom doesn't have it's own bath or even a walk-in closet, but it gets great afternoon light.  It has enough space for the furniture we need and the squeaky wood floors are a reminder of simpler times.
 
When you are designing and decorating your house, where do you get your inspiration from? 
I find inspiration everywhere!  The conventional places like magazines, design blogs, home stores.  And some  unconventional places as well.  I love wandering around office supply stores, the ribbon section at a local craft store, or an antique shop. 
 
What is your favorite piece in the cozy brick house? 
I created a wreath out of book pages a couple of years ago.  It adds a bit of whimsy to a more traditional space in our home.  It's also sculptural and I really love it. 

Cozy brick house


How did you decide on a color palette for your home? 
I naturally lean towards colors that are found in nature.  Browns, greens, oranges...sometimes a little too much.  Recently, after having my fifth child I was sitting in the living room nursing and began to feel suffocated by all of the brown.  I hadn't really ever taken the time to sit and notice how much color was missing from that space.  Currently I am in the process of adding more color through paint and textiles.  Spicing it up a bit.

What color of paint is in your master bedroom & dining room?
"Pecan" Valspar paint from Lowes.  Valspar is the best coverage paint we have used, and we've tried them all!  This is the same color as the dining room.

Kids Room


Where did you find the chair in your daughter's room?
I found the chair at goodwill before my oldest daughter was born. I painted and distressed it, then had it re-upholstered just in time for her birth almost 8 years ago. It's still in great shape and is the best place in the entire cozy brick house to rock one of my babes.

Share your favorite DIY project in your home.  Tell us a little bit about it. 
My current fave DIY was one that I just completed.  You can learn more about it here.

Since it's Back to School week here on Fresh Nest, would you mind sharing some pointers?

  1. Start implementing your school bedtime NOW!  We started a week ago.  We still have two weeks before school starts here, but I wanted the children used to our old schedule BEFORE the big day.  No more of this 10:30 business!

  2. Menu planning.  Summer has wreaked havoc on my dinner schedule.  With BBQ's and vacations I'm dying to get back to a regular weekly menu.  This is a great tool.

  3. Inventory.  We are headed out on our final vacation this week.  We're going to the ocean on the Oregon Coast and doing the bulk of our back to school shopping while we're visiting that lovely sales tax free state.  To prepare, I've been taking inventory of my children's wardrobes.  What they need, what from last year will still work, etc.  I'm also using this opportunity to get rid of ill fitting, stained or un-usable items. 


Thanks Danyelle for sharing your cozy brick house with us and for the bonus back to school pointers!  I am amazed at all you are able to do.  It truly inspires me.  Consider your house Fresh Nest approved!

deb_sig

Children's Study Spaces

When planning a study space for your children, remember that everyone learns differently!  Keep this in mind as you plan your space.  Maybe they like studying with music on...make sure that there's some type of music source close by so that they don't have to get up to switch out music or adjust controls.  If they get easily distracted make sure it' s in a quiet place and not looking out towards a window.   Even if you don't have a whole room to devote to a study space a little section of their bedroom will work just fine!

Color theory is another post altogether so don't worry too much about what color you choose to have in the space.  If it's already in an existing room you're probably going to go with colors already there.  If you'd like to add some color, and make it more of a personalized space for your child, go with their favorite color!  They'll probably want to stay there longer because of it!

Make sure that you've got enough supplies close at hand so their train of thought doesn't get broken too often as their looking for more paper, pens, staplers, etc.

Here are some inspiring study spaces I've found!

Children's Study Spaces


From Italian Furniture Manufacturer Berloni


Children's Study Desks


1. From Pottery Barn 2. Roxxn 3. Elfa Storage Options 4. Minimalist Desk 5. DIY Ideas


erin_sig

Monday, August 17, 2009

Back to School- Creative Calendars

Can you believe summer is coming to a close?  This week, we are focusing on Back to School around here.  Since we are all going crazy with getting our children organized, making sure we have everything off their classroom supply list, I thought it would be fun to feature some of the best things to get us organized and looking pretty for this school year.


The first thing I wanted to talk about is a calendar.  In our home, my husband and I share a google calendar and it works okay (we aren't always the best at syncing everything to make sure it's up to date).  We also have a large whiteboard calendar in our office that I love.  I love being able to write things down and have them visually laid out for me.  Here are some prettier options for calendaring:


Creative pretty calendars


1.  This calendar comes for Pinch Design (via ohdeedoh) and it's wonderful if you are the type that likes to take week by week.  It's also a chalkboard so if things are shifting and changing around your house all the time, it's easy to change.


2.  I love the shades of color on this calendar seen on Martha Stewart.  It is also made of chalkboard paint and is great at taking one month at time.  Step by step instructions here.


3.  This is Design Mom's calendar and I love it!  I love that the colors change with every month and I love how she involves the children in creating with each new month. 


I'm curious, what type of calendar do you use at your home?


deb_sig


32 lbs. of joy

My little man is sure growing up. Everyday it seems like he's doing something new. Geez, I love this little guy alot. All 32 lbs. of him. Worth all the loss of sleep and back pain. It's true when they say there's nothing like your own kids.

Caden3


Caden2


Caden1


**Note, the first two pictures have NO editing on his eyes. His eyes are just that beautiful.