Showing posts with label tutorial. Show all posts

Friday, February 10, 2012

DIY Party Blower Valentines


I have one more Valentine DIY to share with you today.  I'm a big fan of making everything a party so why not include party blowers in your Valentines?  I created a little DIY if you're feeling crafty and want to make your own party blowers.  If not, no biggie, you can buy them at the store.  Head on over to Design Mom for the full DIY and printable.

If you're still on the hunt for that perfect Valentine, here are a few I've seen around the web that I like.


I hope you all have a great weekend!  See you on Monday!  xo

Wednesday, November 09, 2011

How To Make A T-Shirt Cape


My 3 year old is obsessed with super heroes.  Often times he can be found defending multiple universes in a day using unique super fighting powers.  He convinced me after seeing a superman costume at Halloween that a cape would give him more super powers.  Here's a quick tutorial to show you how we made his cape out of a t-shirt.


1. Find an old t-shirt (if it has no side seams, all the better).  Cut off the sleeves at an angle.
2. Continue cutting down the shirt.
3. Cut around the neck.


5. Cut the neck line in half.
6. Measure your child's neck and cut off excess.  Hot glue velcro (or sew, if you prefer).
7. Make your child super with their own logo with some felt and hot glue.  I added a texture by embroidering the letter C.  It didn't take that long and I thought it would help keep everything together.


Now, enjoy being a super hero and show me what you're made of! I'm tempted to make one for myself it was so easy.

Tuesday, May 17, 2011

Locked Out


I'm so thankful for nice neighbors.  We were locked out of our house this afternoon.  (I blame it on our self-closing doors).  I'm also thankful for nice weather.  Those four hours would have been really long if it was rainy out.  And another thing I'm thankful for?  Bananas.  They kept Mr. Porter happy until our hero pulled up in the driveway.

I'm not so sure I'm qualified to give a dose of happy today, but I found a tutorial for these neat watercolor business cards.  I think you can probably see why I like them.


Now I need to bake something nice for our great neighbors to thank them for taking us in part of the afternoon.  Any ideas?

|spotted on pinterest|

Thursday, February 24, 2011

Second Lampshade = Success!

You may remember my lampshade fail from a little while ago.  This weekend I tried it again, with some fabric instead of ribbon, and I LOVE how it turned out!


All you'll need is 1 yard of fabric , some super stiff interfacing, and coordinating 1/4" ribbon.  (I used a heavy weight fusible Pellon for my interfacing.)


Cut a piece of the interfacing in the exact dimensions that you'd like you're lampshade to be.  Then cut your fabric the same width as your piece, but make it 1" longer so it'll overlap the interfacing by 1/2" on either side.  Iron on the fabric to your interfacing.  I then top stitched around both the top and bottom to make sure the fabric was nice and secure.  (You can see this in the top picture.)


After you've attached the fabric to the interfacing, wrap the  edges around the metal frame and use a hot glue gun to secure it.  If you needed to piece your fabric together like I did you'll have to hide your seams.  I used a narrow satin ribbon to conceal my seams.


A couple of things to remember when choosing your fabric:

*The fabric looks much different with a light shining through it.  Hold up a test piece to a light bulb to see how it will look with the light behind it.  Make sure you still like how it looks!

*Check to make sure there are no stray threads that get caught between the interfacing and fabric.  They will show up through the finished lampshade when lit.

Now it's time for me to move onto the next project: a fake wall to conceal some very stuffed bookcases!

Tuesday, September 28, 2010

Recipe: Ranch Chipotle Pasta Salad

This weekend I made one of our favorite pasta salads, Ranch Chipotle Pasta Salad.  It's super simple to put together, makes a whole bunch, is delicious as a leftover, and never survives any picnic I take it to!  In short, it's fabulous!


Ranch Chipotle Pasta Salad

Ingredients:

1 box rotini pasta (cooked and rinsed in cold water)

3/4 cup sour cream (I use the light kind.)

3/4 cup mayonnaise (I use light kind here too.)

3/4 cup milk (any type works fine, usually I just use 1%)

1 package ranch dressing mix (not the dip mix)

1 1/2 tsp. chipotle chili powder

1 cup frozen corn

1 can black beans, rinsed and drained

1 bunch cilantro, chopped

1 small can sliced olives

Tomato and Avocado if desired


Mix sour cream, milk, mayonnaise, ranch dressing mix and chili powder in a large bowl to make the sauce.


Add the corn, black beans, cilantro and olives.  Mix thoroughly.  Add in cooked pasta and top with tomato and avocado!  Enjoy!

Monday, September 20, 2010

Corkboard: From Drab to Fab

So by now you know that I'm pulling more color into my house color scheme.  I did this simple project over the weekend that made a huge difference in my house!  I had a regular cork board...


and I knew there was something I could do to spruce it up!

So I added some baseboard, paint, fabric flowers, a little ribbon and voila:


Bet you didn't even recognize it!

How do you make your own?


1. Use some acrylic paint and paint the cork board surface.  I used the Linen color of FolkArt paint.  It took about 1 ½ bottles to cover the surface.


2. Buy, measure, and cut baseboard at 45 degree angles to make a nice frame.  Most custom frames will cost you hundreds of dollars...mine cost $9!  Paint it the color you'd like.  Adhere the frame to the cork frame.  (I did this new frame because the teeny tiny cork board frame was just out of scale to me and I wanted something a little more beefy!  This is the before and after paint pictures.  Please excuse the cat, this picture was the one with the least amount of cat...)


3. Cut out various sized circles out of satin fabric and melt the edges over a candle.  (Don't forget to wear your sunglasses, otherwise you'll damage your eyes staring at an open flame for that long.)  Layer a few different sized circles and hand stitch together, adding some beads as you go.  Make leaves with green ribbon.


4. Adhere ribbon to cork board, right inside the frame.  Layout and adhere your poppy flowers.  Hang up!


After I hung it up it looked so good I didn't want to clutter it with all my normal bulletin board stuff so I made a little shopping list that coordinated with it instead!

Want your own shopping list?  You can download it here

There are 2 per page so I printed about 5 (so I'd have 10 pages) then trimmed them on the gray lines,


added some patterned paper to the chipboard back which is slightly larger than the list,


punched holes near the top and held it together with brads,


and put that on my board!  If you don't have chipboard, try an old cereal box instead!  Only thing I have left to do is customize some push pins, which I'll show you how to do soon!

Have a great Monday everyone!

Thursday, August 12, 2010

DIY Artwork

I'm loving this DIY artwork by Jan!


I never would have thought to use joint compound (what builders use to smooth the joints of Sheetrock walls) to make some great textural artwork!  You can check out her step-by-step tutorial here.

Monday, July 26, 2010

How To: Etched Dinner Glasses

I made these as a gift this weekend, and let me tell you, it was easy and they came out looking so fantastic!!  Everything to make the glasses will set you back around $10 (with your Michael's coupon), and that includes the glasses!


Supplies You'll need:


Dinner glasses.  I got 2 sets of 4 for 2.39 at Target.  $4.78 Spent

Glass Etching Cream.  Even though 3 oz doesn't seem like a lot, I used less than half a bottle for all 8 glasses!  Around $8.  (If you use a coupon from Michaels you can get it at 40% off!)

Contact paper/Vinyl/Stickers etc.  Any of these will work to make your pattern with for etching.  Want to stick with stripes?  That's easy too, just use tape!  (price varies)

Foam Brush

Directions:


Wash and dry your glasses so you have a clean surface to etch.


Lay out the shapes you'd like to etch and adhere them to the glass.  I made the shape I used in Illustrator and then had my Cricut cut it out for me.  (Here are the shapes waiting for the etching cream.)


Paint a heavy coat of the etching cream on the glass and let it sit.  I usually do 2 at a time.  You don't have to let it sit very long, usually just 4-6 minutes.  (Don't forget to place some old newspapers or a plastic bag on your work surface to protect it from the etching cream.  Also, please work in a well ventilated area, this stuff is dangerous if used in a closed, un-ventilated space.  We want you to be safe!!)

Rinse off the glasses and remove your stickers.  (I like to make my etching cream last as long as possible so right before I rinse my project I use my brush to scrape off as much of the etching cream as possible and put it back in my container.)  Let dry, and you've got fabulous new glasses!

Monday, June 28, 2010

Make It: Serving Dishes

I started out with a variety of clear glass plates, bowls, and votives from IKEA.  If you don't have an IKEA around, try a Dollar Store or another discount store for cheap glass dishes.  I think I spent about $6 for everything seen here:

{pic of loot}

Play around with stacking them to see what configurations are available.  Try different heights of votives and different sizes of plates and bowls for the most options.  I decided on these stacked configurations:

{pic of stacking before painting}

Next decide what paint colors you'd like to use.  I wanted to use some neutral colors so I chose white and champagene colored paint.

{pic of paint cans}

In a well ventilated area on a not so humid day, paint the backs of the bowls and plates and the inside of the votive.  By painting the back/inside you have back painted glass which looks great!

Use E6000 glue to glue your stacks together.

Set your table for a party and enjoy the compliments you get from your great looking serving dishes!  Because it's so inexpensive to make, try different colors like fuschia and violet or aqua and lime green depending on the occasion!  You don't have to tell them you just spent $6 and a little bit of time!  That can be our little secret!

Thursday, June 17, 2010

July 4th Place Setting Pattern

Remember the project I completed for BurdaStyle for Mother's Day?  They asked me to complete some modifications to make it work for your July 4th get together!  You can see the full project tutorial and instructions with pictures on BurdaStyle here, here, and here!  (Did I mention it's a free pattern?)


Wednesday, May 12, 2010

Kitchen Utinsel Organizer DIY

I've been in the process of de-cluttering my kitchen.  I wanted to try to keep my counter top clean, since our current kitchen has no counter space.  I decided I needed to get rid of the huge container that had been sitting on my counter that held pretty much every utensil I had.  Whisks of various sizes, pasta forks, spatulas, stirring spoons, and everything else all shared the same container.  It was getting super crowded and I don't use those things all the time so I dumped the entire contents into one of the drawers... better already.  Only problem was, a few of the items I use at almost every meal.  I decided I needed a smaller container that I could leave out that would just hold a couple of items.  The problem with a smaller container is that when I put the utensils in, the entire container would tip over.  After some trial and error my solution was that I needed a medium sized container with some type of filler to keep my utensils from tipping and falling out.  My solution?

Combine a $1 decorative ceramic pot from IKEA:


A bag of nice decorative rocks:


Add the few utensils I use all the time:


Much better!  Nice, clean, and organized!

Friday, April 23, 2010

Confession time: Sewing

I have a confession to make.

I don't know how to sew.

Well, that's not entirely true... I can fake my way through making a pillow and other easy projects, but I don't have the creative genius of people like this and this.

In hopes that my husband, or mother is reading this.  I'm begging for a sewing machine for my birthday so I can dink around and actually learn how to sew. 

Here are a few projects that are on my list already. 


The Rollie Pollie.  Finding the perfect fabric for this would be a treat!


A lovely bird mobile


Beautiful ruffle pillows.  A perfect addition to our nearly completed bedroom.  Don't you think?


Do you know how to sew?  How did you learn?  Do you have any great resources to share? 


Now, if my birthday could only come sooner.... August seems way too long to wait and get started on this!  Don't you agree? 


Friday, March 05, 2010

Design Basics-Balance

Balance is VERY important in a great room design!  It gives the person in the space a sense of calm and peace.  There are two different types of balance:

Asymmetrical Balance and Symmetrical Balance.

Symmetrical Balance is very balanced and even in nature.  It has a sense of symmetry and many times is much like a mirror image.  If you take half the room and mirror it, it will look the exact same! Symmetrical balance is very easy to design and is great for a beginner!

Asymmetrical Balance is just that, asymmetrical.  It uses different elements of design like color, texture, and size variations to appear balanced, even though it's not a symmetrical mirror image. Asymmetrical balance is a little more difficult to balance out but can be done with a little practice.

Here are some examples and my explanations of how they are balanced:


Ideas for tabletop display: Bright pottery + black-and-white photography


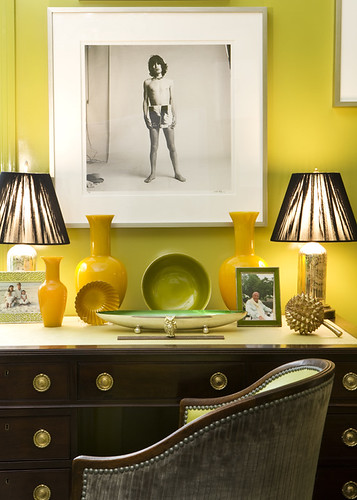
This one is almost symmetrical, but not quite, therefore I'm labeling it Asymmetrical.  The left side has three different similar colored objects (picture frame, small yellow vase, small yellow bowl) that balance out the two darker objects (green frame, pine cone) of the right side.


White living room + mid-century pieces: Le Corbusier daybed + wood accents


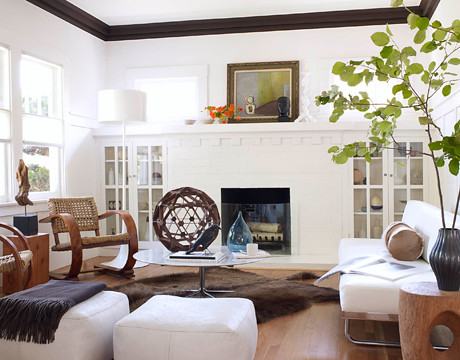
This is a great example of asymmetrical balance.  In this photo the artwork on the mantle is not symmetrical.  The white and black accessories, though they take up much more space than the orange arrangement, are balanced well.  By choosing the white candlestick, it blends into the wall and feels less visually heavy than it really is.  Even the furniture is asymmetrically balanced.  The large white sofa balances well with the smaller, darker wood chairs and end table.


Blue + brown bedroom by Nickey Kehoe: Doubletree Los Angeles


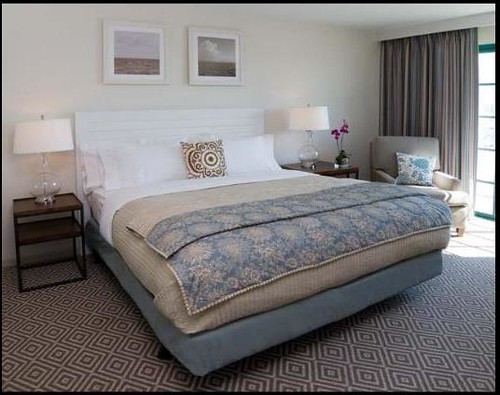
This (besides the little purple orchid) is a great example of symmetrical balance.  It's perfectly balanced between the matching end tables, lamps, and single pillow to add a nice focal point.


1960s Palm Springs mid-century modern bedroom, from Met Home


Great example of asymmetrical balance (and a great arrangement for a wall with a slanted ceiling line!)  The large sculptures on the dresser on the left seem to balance that side well and are balanced well with the white lamp coming down into the space.  The white lamp actually seems more visually heavy in the space because of the high contrast between the light lamp and the dark wall paint.


Benjamin Moore 'Winter Solstice': Gray living room + built-in bookshelves, from Elle Decor


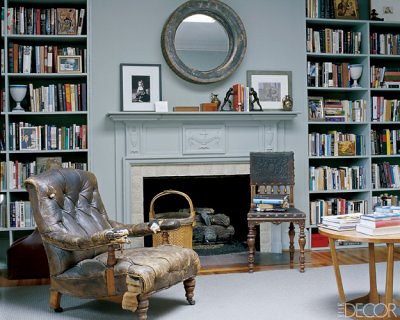
This is another great example of asymmetrically placed accessories on the mantle.  Imagine the mantle with just the circular mirror and the two picture frames.  It's not balanced with just that!  By adding the dark book holders and small accessories in front of the gray framed picture it's visually balancing the darker frame and print.


Hope you enjoyed the lesson!  (Click on the photo to be taken directly to the source.  There are more examples of asymmetric vs. symmetrical design.  It's a lot easier to see symmetrical, but sometimes the asymmetrical designs can be less obvious.)