Showing posts with label paint. Show all posts

Thursday, March 01, 2012

Bath Paint

My kids loved this activity.  Painting in the tub is wonderful!  They would have stayed in the bath all night had I let them.  Bath paint is really easy to make and clean up, too.  So I'm logging this one for one of those days when we're all going stir crazy in the house and don't want to leave.  It doesn't have to be night time to take a bath.

SUPPLIES:


  • Soap (I used baby soap-pictured above)

  • Cornstarch

  • Food coloring

  • Ice cube tray (or something similar to mix the different colors)


INSTRUCTIONS:

  1. Mix equal parts of soap and cornstarch with a spoon.  (I mixed 1/4 cup soap, 1/4 cup cornstarch and it seemed like the perfect amount)

  2. Place a little bit of mixture in each compartment of the ice cube tray.

  3. Add 1-3 drops of food coloring per compartment depending on how vibrant you want the color.


In the bath, the children can use paint brushes, foam brushes, sponges or their fingers.  It was super easy to clean up, but be careful.  Since there is so much soap in this mixture, it makes the bath really soap and slippery.

In case you're wondering, food coloring did not stain my bathtub.

Monday, November 14, 2011

Leaf Painted Turkey


This morning Caden and I were feeling a little creative and made a little turkey with leaves and paint.  It's simple, super easy and a lot of fun.


Supplies:


  1. Paint

  2. Leaves

  3. Cardstock

  4. Googly Eyes

  5. Plate


It was fun to see where Caden put the eyes.  "Now it's alive, Mom."

Do you have any fun Thanksgiving crafts that you're doing at your house?

Friday, March 25, 2011

Knee Deep in Color

I've immersed myself knee deep in color.  It's a little more than exciting to have a "new" home at my finger tips.  Kind of like a blank canvas just waiting for me.  So who better to consult than Pantone for a new color palette?

Have you seen their fashion fall 2011 report?  The colors are ah-maz-ing!


I love the mixture of neutrals with the spring-like colors.  So does that mean we are going to have a brighter fall this year?

I sure hope so!

Now if only Pantone packaged their paint like this.


I think I would buy their paint cans just to display them.  {concept work by Samy Halim}

While I wait for our new home, I think I'll make some Pantone magnets.


Such a great DIY project by How About Orange.


What are you up to this weekend?  Any fun plans?  Do tell.


Monday, January 10, 2011

Painted Ceilings

I ran across this room and fell in love.  The wonderful crisp white trim sets off the color of the ceiling wonderfully!


Photo from Ani-Bee.

What do you think?  Would you paint your ceiling a fun color like this or would you stick with a neutral?  I think I'd definitely be willing to try a color on that often neglected 5th wall after seeing this space!

Tuesday, September 07, 2010

Before & After: Master Bedroom

We love it when readers send in their redesigns.  Audra sent in her before and after pictures of her master bedroom and it doesn't disappoint.

Here is the before picture:


Audra transformed her master bedroom by adding some new curtains.


I love how she used a piece of ribbon to join the two fabrics together.  It adds a piece of contrast and masks the seam.  Genius!

Audra also dressed up the the space above her bed by using decorative pieces found in the clearance aisle at Hobby Lobby.  All of which were less than $2!  They were a gold in color so she painted them a nice, refreshing blue.  Now that's what we like to hear!

Here's the after picture:


What a great transformation, at a great, great price!  Way to go, Audra!  To see more pictures of the room, head over to Audra's blog.

If you have something you'd like to share with us, shoot us an email at admin@freshnestdesign.com.

Monday, August 16, 2010

Before & After: Laundry Room

Happy Monday everyone! Did you have a fun weekend?  I sure hope so.  My husband was back in town over the weekend and we hung all over each other all weekend.  It's like we were in college all over again.


I had a short list of honey-do's for him and it included helping me hang a couple things in our laundry room.  About a month ago, I mentioned how I was going to paint my laundry room.  And by golly, I did.

Here is the before picture.


The paint was an unwashable flat paint that wasn't tolerating my 2 year old and boxer dog very well.  {On a side note, did you know that Sherwin Williams makes a washable flat paint?  Genius, I tell you}.

In choosing a color, I knew I wanted something subtle and refreshing.  I started thinking some some blues would be nice, but in trying to keep a halfway consistent color palette throughout the house, I leaned towards a green color.

Here is the after picture:


You'll have to excuse my flashy pictures, but they were taken late last night.  The paint color I choose is Sherwin Williams Grassland {SW 6163}.  As I was painting, I feared that I had gone too minty, but luckly I stuck with it as I think it has a very calming character to it - which is the exact thing I wanted!


A couple of details on the wall hangings.  I found the mirror at a local thrift store for $10.  This is what it looked like when I bought it:


As much as I love a touch of gold these days, this was a little much so I spray painted it white.  As you know, I have a tendency to paint everything white.


And when we were shopping at Target this last week, I found this coat hanger on clearance for $9.


Only, when I checked out, it rang up at about $3.50.  Don't you just love it when that happens?  I knew the blue color wouldn't work, but I could easily spray paint it white, and save a few bucks.  {The competing coat hanger was $20 and it had a shelf above the hangers}.


A couple simple changes and my laundry room feels brand new!  All for a reasonable cost of about $40!


Monday, July 05, 2010

DIY: How to Paint

In honor of my painting weekend, I thought I'd repost this painting tutorial for you.  Enjoy and I hope your having a great 4th of July weekend!

Do you have a room that needs to be painted, but you don't know where to start?  Never fear, we are here and will show you how to paint a room step by step.  We'll start with the supplies needed and how to prep your room so it's ready for paint.
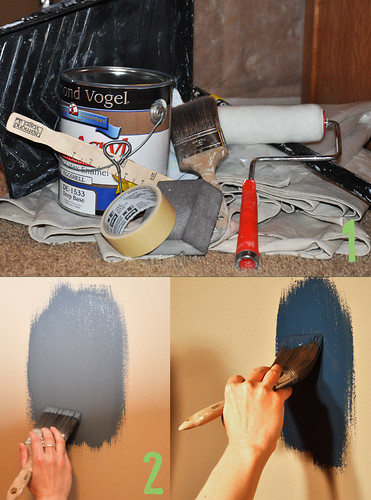
How to paint


Step 2: Paint a swatch (or two, or three!) to make sure you like the color before you invest time into painting the entire space.  I usually paint about a 1'x1' square on the wall and revisit it after it drys to make sure I like it.
How to paint


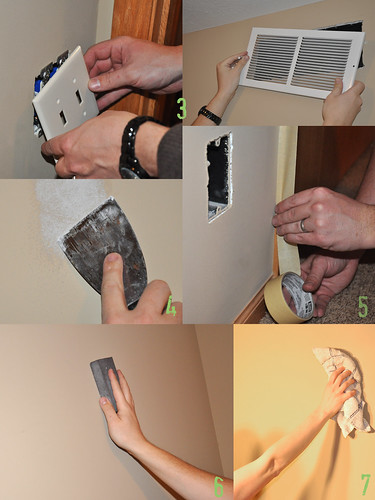
Step 3: Remove all hardware from the room- i.e. light switches, vents and plugs, etc.

Step 4: Spackle holes that you no longer need and patch any repairs on the walls.

Step 5: Use the 1.5" masking tape and tape to baseboards, door/closet trim.  Use this to cover up any woodwork that you don't want the paint to get on.

Step 6: Sand the entirety of the room.  Not only the spackled areas, but the rest of the walls too.  This ensures a smooth finish to your final paint job.

Step 7: Use a old towel to remove any dust left by the sanding.

Now that we have all of our supplies and have done all the prep work to our space, we are ready to paint.  Do you have trouble painting with a brush and making sure your lines are straight?  I will be giving some pointers on what works for me and how I keep my lines straight.
How to paint


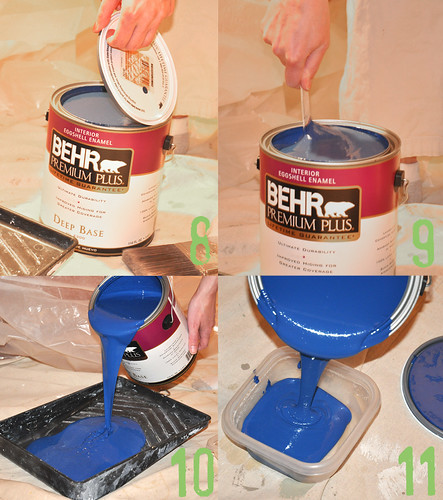
Steps 8 & 9: Open paint & stir.  You want to be sure to stir the paint really good so it is consistent throughout.

Steps 10 & 11: Pour the paint into two different paint pans.  I use a large paint pan for the roller and a small container for the brush- just make sure it's wider than the brush.
How to paint


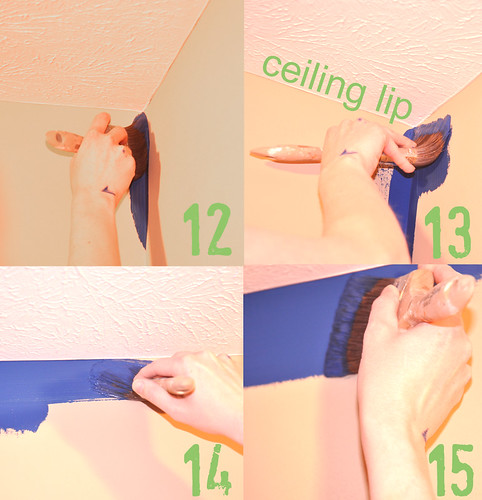
Step 12: Start with your paint brush in one corner.  Notice how I'm holding the brush and it's at an angle {this is called cutting}.  Angle the brush so it comes to a point and slowly work your way to the top of the corner where the ceiling and walls meet.

Step 13: Most ceilings have a slight lip which makes for slightly easier painting with your brush.  Use this lip to guide you.  Again, look how I am holding the brush.  I angle it to make my way toward the ceiling lip.

Step 14: One I have the paint brush where I want it, I start dragging it along (but under) the ceiling lip.  I usually drag the brush for about 12"-18" depending on how loaded my brush is with paint.

Step 15: I go back over the section I painted in the previous steps to make sure my paint coverage is good and there aren't any places I missed.  I usually leave about a 2.5"-3" paint line on the top and bottom of the wall to provide sufficient clearance for the roller.

Step 16: Paint along the baseboards in the same section that you painted the ceiling.  The baseboards are a little more simple as there is tape there protecting the wood.  However, don't overload your brush with paint.  If you have too much paint, it will start to bleed underneath the tape.
How to use a paint roller


After you have gone along the wall with the paint brush for about 4'-5', the roller can start rolling.

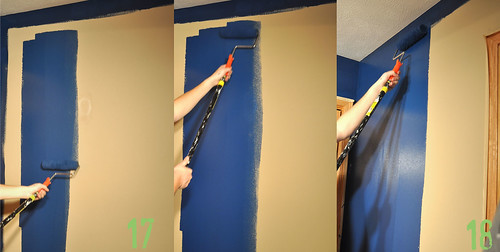
Steps 17 & 18: Start about half way down the wall with short rolling strokes in the letter of a N or M.  Then start to straighten and lengthen your rolling strides.  Be sure to watch for ridges that are coming from your paint roller and flatten them as you go.  Get as close to the corners and ceilings as you can without scraping them.

Step 19: Remove all masking tape from the trim as soon as you are done painting.

Enjoy your new paint job, now it's time to decorate!

Paint is by Behr and is called Mediterranean Blue.

Tuesday, March 30, 2010

Exterior Paint Inspiration

Now is a great time if you've been needing to repaint the exterior of your home!  Perfect spring weather and not too hot to spend extended amounts of time in the sun.  Need some inspiration?  Here are a few exterior paint jobs that are great palettes!
Exterior of home


New Home Exterior at Overlook


Wednesday, November 04, 2009

Benjamin Moore's Style 2010

Last night I had the opportunity to hear Mary Hoffman, a Color and Design Specialist for Benjamin Moore!  I heard a little bit about Benjamin Moore and their process for choosing their color palettes for the year.

Benjamin Moore Color Preview


This is one of their color palettes for next year.  I love the European feel to it!  Very clean, chic, and contemporary!


I absolutely love color theory and anything having to do with color.  I find it fascinating that they forecast the colors about 2-3 years out.  So yep, back in 2007 they forecasted that purple would be big this year...and sure enough, we're seeing purple everywhere now!


To choose the color palettes they come up with a theme (or a few themes).  The particular color palette above was based on Ingenuity.  They saw that designers would be using color in unconventional palettes.  Their other palettes were based off of New Luxury and Genesis.  The New Luxury color palette featured rich purples, yellows, oranges, and darker bronze neutrals.  Almost Eastern inspired.  Their Genesis palette featured a much more monochromatic palette which focused on colors found in nature.  Texture was a big factor in this particular color palette to provide some relief from the monochromatic colors.


She talked some about their paint (which I'll share later) but she hid paint chips throughout the store (Pottery Barn) and made it a game of finding them.  She was showing some colors that coordinated, and some new color palettes we would start to see next year.  Mary mentioned that along with more purple next year we'd start to see navy pop up again.  (You heard it here first folks!)  Here are some of the paint chips I found in the store:


Paint Chips


We've seen a lot of yellow, grey, white color combinations, but pinks will be added to the palette next year too.


More Paint Chips


Love how this gorgeous green provides a soft feeling to all the dark wood tones.


Even More Paint Chips


Here's some more purple!  Love it with the neutrals and metallics!


Be sure to check out their site!  They've got lots of great resources and inspiration photos too!


erin_sig

Tuesday, June 30, 2009

Staircase Gallery

I think that many times staircases get overlooked in a homes' design.  Here are some that make a statement all their own!

Storage Stairs


Source


I love this one because of the dual purpose it serves.  Not only is it stairs, but it provides tons of storage space and makes for an interesting design element.  (Yes, there are no handrails so based on where it is and whose living in the home it might be against code to build with no handrails.)


stair2


Source


This one's beautiful natural materials speak for themselves!


stair3


Source


This stair design, at first glance is just a standard wooden staircase.  But all the risers are actually drawers!  Ingenious!  This is in my file for ideas for my own dream home!


stair4


Shawna's Stair Redesign via Homebug.  Another awesome idea!  These stairs were carpeted.  She removed the carpet, painted the treads and wallpapered the risers.  Absolutely gorgeous and such clean design!


stair5


Apartment Therapy Boston


I love painted runners on staircases.  It's a quick way to add a color accent.  Imagine how boring this home would be without that simple painted blue runner!


Ok, I have so many more awesome stairs bookmarked so I think I'll save some more for later!


erin_sig


**Don't forget to enter our current design challenge!  See here for details and the submission form!  There's an awesome headboard up for grabs to the winner thanks to BedroomFurniture.com!


Headboard