
In honor of my painting weekend, I thought I'd repost this painting tutorial for you. Enjoy and I hope your having a great 4th of July weekend!
Do you have a room that needs to be painted, but you don't know where to start? Never fear, we are here and will show you how to paint a room step by step. We'll start with the supplies needed and how to prep your room so it's ready for paint.
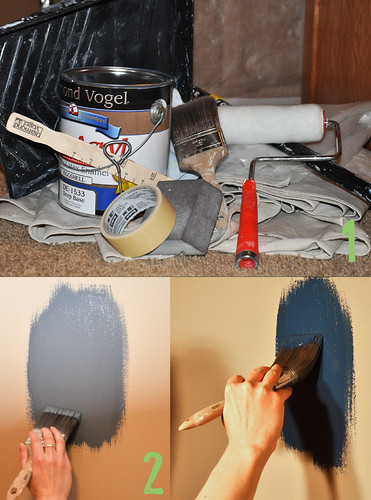
- Sanding Block
- 1.5" Masking Tape
- 3" Paint Brush
- Paint Roller with Roller cover
- Paint Roller extension (adjustable)
- Paint pan
- Paint w/ stir stick & opener
- Painting Tarps
- Ladder
- Extra lighting
- Spackle
Step 2: Paint a swatch (or two, or three!) to make sure you like the color before you invest time into painting the entire space. I usually paint about a 1'x1' square on the wall and revisit it after it drys to make sure I like it.
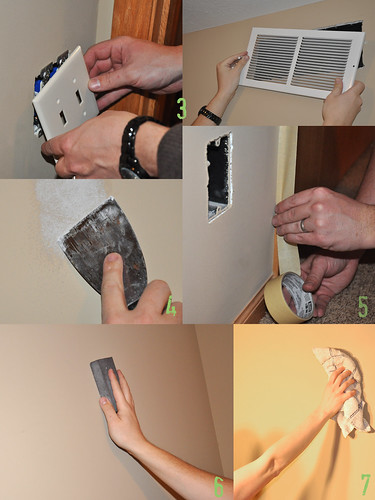
Step 3: Remove all hardware from the room- i.e. light switches, vents and plugs, etc.
Step 4: Spackle holes that you no longer need and patch any repairs on the walls.
Step 5: Use the 1.5" masking tape and tape to baseboards, door/closet trim. Use this to cover up any woodwork that you don't want the paint to get on.
Step 6: Sand the entirety of the room. Not only the spackled areas, but the rest of the walls too. This ensures a smooth finish to your final paint job.
Step 7: Use a old towel to remove any dust left by the sanding.
Now that we have all of our supplies and have done all the prep work to our space, we are ready to paint. Do you have trouble painting with a brush and making sure your lines are straight? I will be giving some pointers on what works for me and how I keep my lines straight.
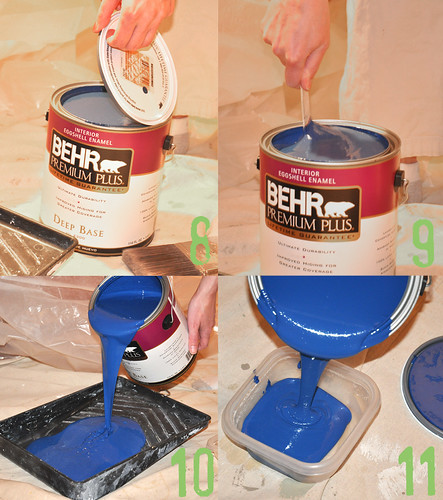
Steps 8 & 9: Open paint & stir. You want to be sure to stir the paint really good so it is consistent throughout.
Steps 10 & 11: Pour the paint into two different paint pans. I use a large paint pan for the roller and a small container for the brush- just make sure it's wider than the brush.
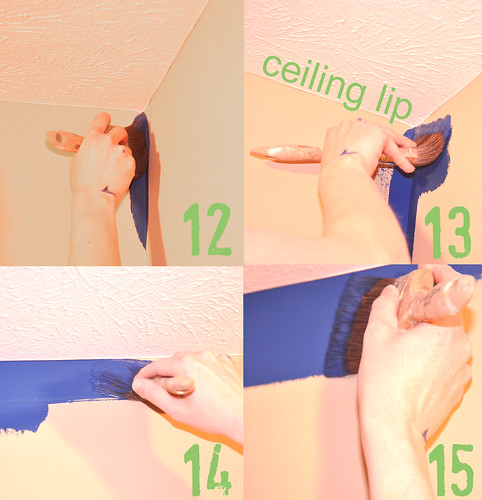
Step 12: Start with your paint brush in one corner. Notice how I'm holding the brush and it's at an angle {this is called cutting}. Angle the brush so it comes to a point and slowly work your way to the top of the corner where the ceiling and walls meet.
Step 13: Most ceilings have a slight lip which makes for slightly easier painting with your brush. Use this lip to guide you. Again, look how I am holding the brush. I angle it to make my way toward the ceiling lip.
Step 14: One I have the paint brush where I want it, I start dragging it along (but under) the ceiling lip. I usually drag the brush for about 12"-18" depending on how loaded my brush is with paint.
Step 15: I go back over the section I painted in the previous steps to make sure my paint coverage is good and there aren't any places I missed. I usually leave about a 2.5"-3" paint line on the top and bottom of the wall to provide sufficient clearance for the roller.
Step 16: Paint along the baseboards in the same section that you painted the ceiling. The baseboards are a little more simple as there is tape there protecting the wood. However, don't overload your brush with paint. If you have too much paint, it will start to bleed underneath the tape.
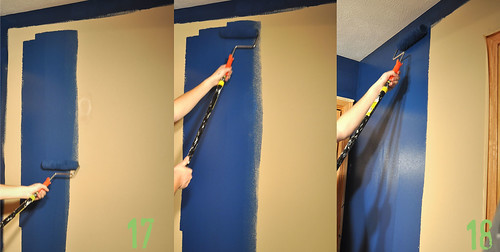
After you have gone along the wall with the paint brush for about 4'-5', the roller can start rolling.
Steps 17 & 18: Start about half way down the wall with short rolling strokes in the letter of a N or M. Then start to straighten and lengthen your rolling strides. Be sure to watch for ridges that are coming from your paint roller and flatten them as you go. Get as close to the corners and ceilings as you can without scraping them.
Step 19: Remove all masking tape from the trim as soon as you are done painting.
Enjoy your new paint job, now it's time to decorate!
Paint is by Behr and is called Mediterranean Blue.


No comments:
Post a Comment